Saturday, February 22, 2014

Princess Dress

I found this super adorable dress pattern online and just had to have it, even though I don't have a girl. I'm not going to lie, it was pretty time consuming to put together. The dresses turned out as sweet as could be. I can already see making them in yellow with red trim for Belle and red velvet for Christmas.

And how sweet would this be as a little flower girl dress?! 

This is the exact reason why I do not need a little girl. I think she would have about 10 of these in her closet. 

Order your own at the link below:

http://www.etsy.com/listing/180296688/custom-princess-easter-flower-girl-dress?ref=shop_home_active_3

Thursday, September 26, 2013

Anniversary

We just celebrated our 3 year anniversary on Sept 19th and I can't believe how much we have been through in our 3 short years. We have moved from FL to SC, bought a house, 2 cars, sold 3 cars, had 2 perfect baby boys, and found a great church home. Since the little ones are still so little, and Malachi doesn't is attached to me, we decided to do a family anniversary trip. I am SO glad we did. I know a lot of "experts" say you should take time away for just the 2 of you and leave the kids at home on your anniversary, but with the closest family in Missouri, that's a little hard to do.

To start off our 4 day weekend we got a babysitter for a few hours Thursday and went thrift/ antique store shopping (a favorite past time but with a little one on the RUN things get broken easily so we don't get to do this much anymore). Jayse and I got to eat lunch with just the 2 of us! then it was off to pick up the kiddos and get packed. I worked out great that we sold our Nissan Juke (Snoopy) to a guy up in Charlotte but that meant we had to drive up separately. So Friday morning I packed up the kids and Jayse drove the juke and we were off on our 2 hour journey to fun! I was super surprised at how well Elias did in the car, BOOKS and Juice saved me from a whiny little man. We got the Juke sold, then it was off to Ikea. I'm pretty sure Elias tested out most of their couches. After getting so remodeling ideas, it was off to the mall to get me some tea from Teavana. Then came bedtime :( We didn't end up getting both kids to bed until 11:30 ish!! Then they woke up at 7 AWW! That didn't seem to stop Elias's excitement when we went to Discovery Kids though! If you are in Charlotte and have kids, this is a must! We played all morning and Elias could of went back later in the day and played more! We decided to head back after lunch in hopes the babies would take their afternoon naps (which they did!),


                          Elias, "WEE"                                                                               Just Chillin
                         Malachi, "Slow down Crazy driver"


Jayse did a great job making the trip special for me. Not only did I get to spend a long weekend with all 3 of my boys, Jayse got me an edible arrangement (I've always wanted one), chocolate covered strawberries (probably my favorite thing to eat in the world) and booked us at Double Tree...FREE COOKIES! I am so incredibly blessed to have the husband I do. He is a wonderful Daddy and an even better husband. I can't wait to spend many many many more years with him!


Yummy awesomeness

Tuesday, August 27, 2013

DIY Felt Letters

Last year I saw some precious fabric letters and thought they were the cutest thing. I figured I could use my scrap fabric and extra batting from quilts. Well, I found after 2 letters that i didn't like how you could see the batting and I would need to encase the batting, and that would take a lot longer... so I moved to Plan B, FELT!
Here is what I came up with.


Materials:
  • 2 bags of poly fill
  • 2 things of any color embroidery floss
  • 13 sheets of felt (Any color)
  • needle
  • scissors
  • printer


Instructions:
  1. Print off alphabet letters. I used Arial, Bold, Outline, size 350, and I turned the page to Landscape. 
  2. Cut out letters
  3. Fold 1 sheet of Felt in 1/2 hamburger style. (so it's fat and not long)
  4. Pin 2 - 3 letters per piece of folded felt and cut out letters. You should have 2 of each letter.


5. Cut floss around 18-24 inches and use 2 threads. 
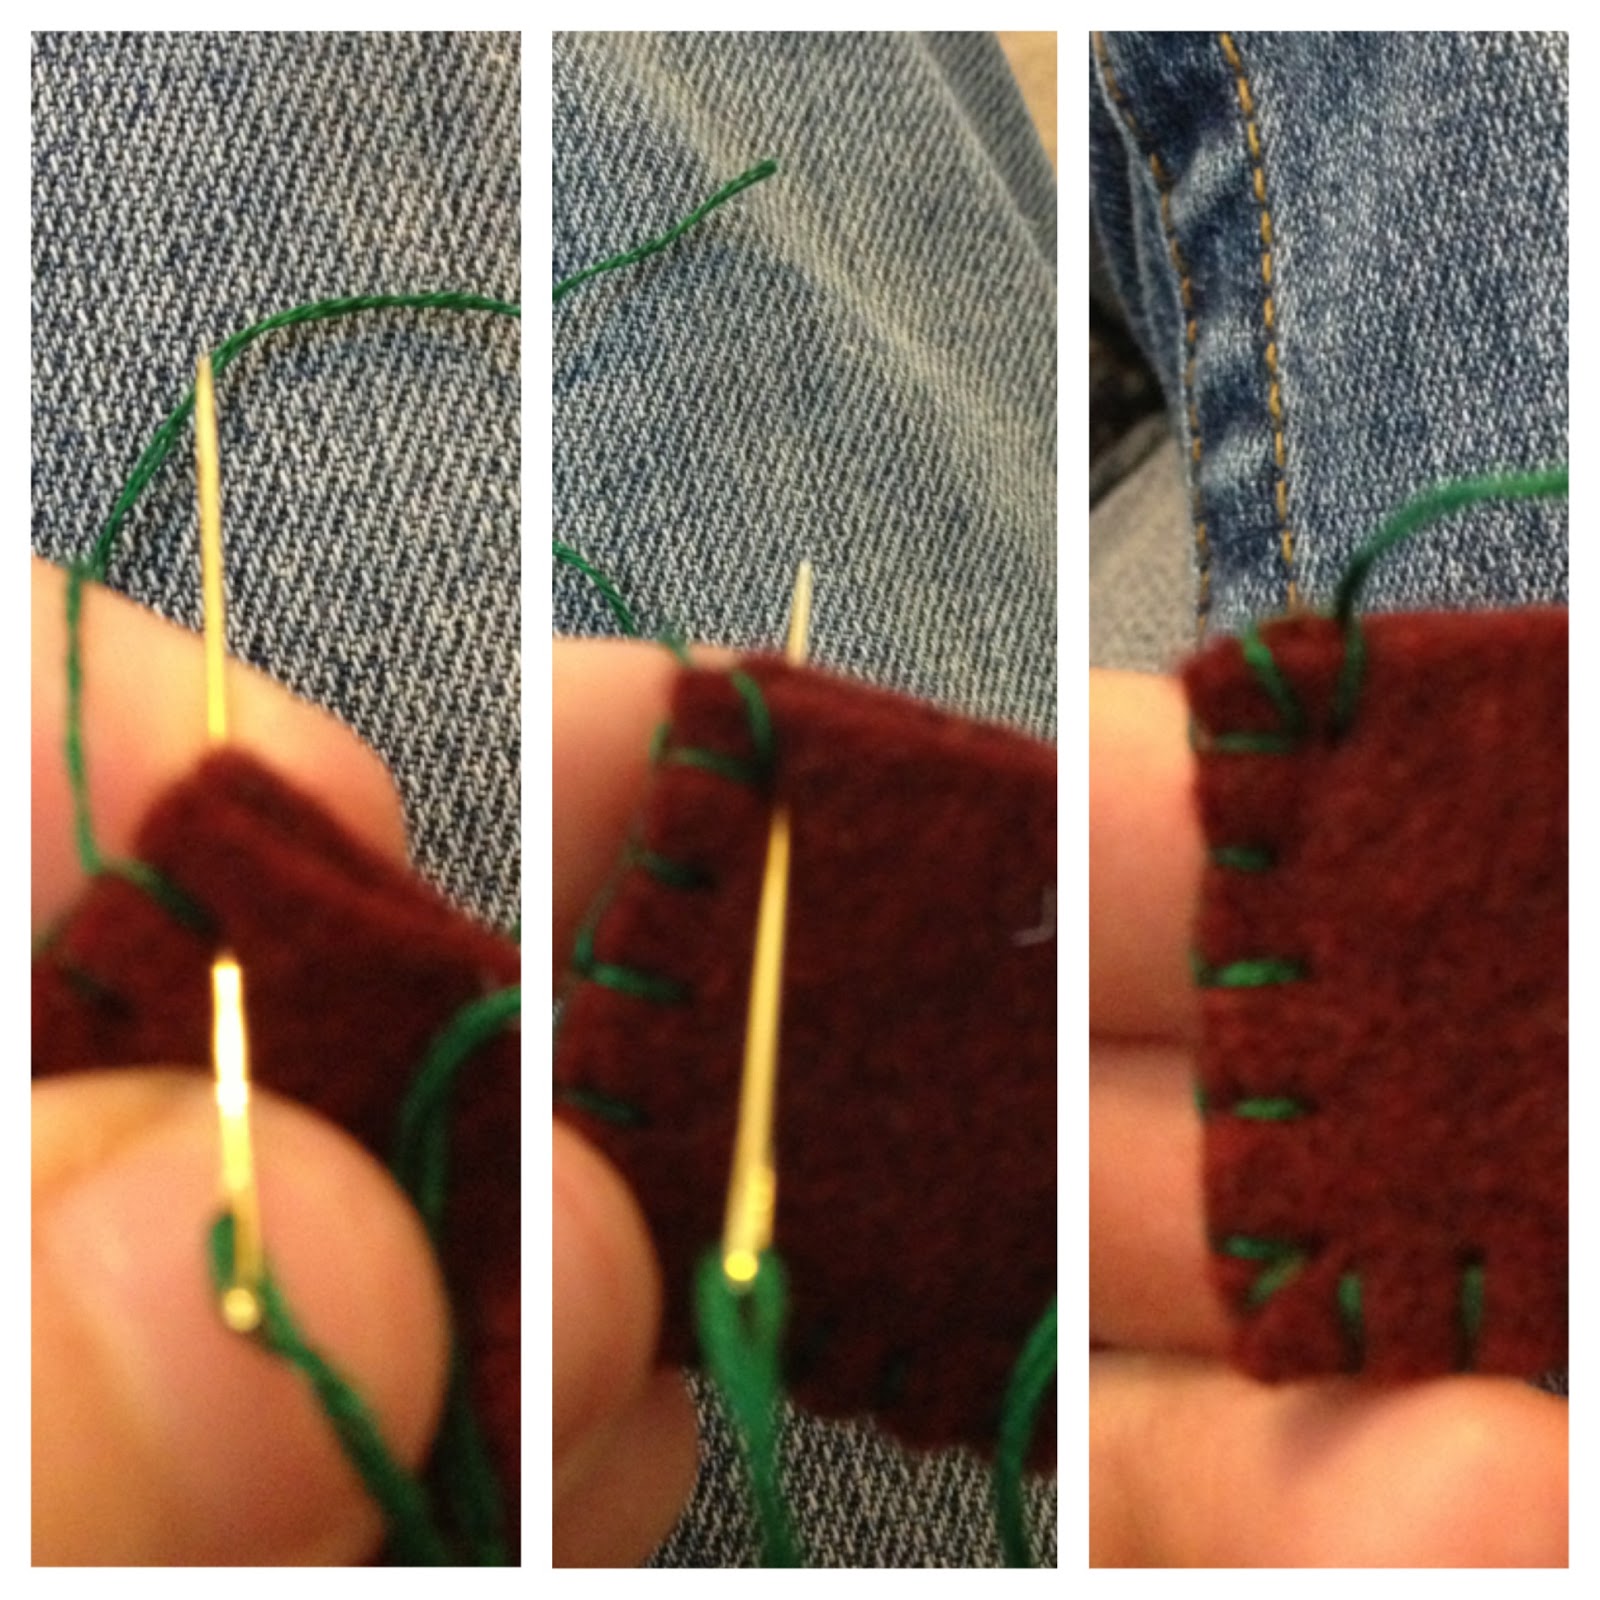
6. Blanket stitch around the sides. Above is a picture of how to do a blanket stitch.

  • Insert needle into both pieces of felt.
  • While holding floss back, push needle through felt.
  • It should look like a little knot is going to form.
  • Pull tight and repeat.

To stitch corners, insert needle into the last blanket stitch hole and add a stitch. This stitch should line up on the corner. Insert needle into same hole and stitch. This will put you on a need side. 

7. Once you have created a tube, stuff it will poly fill. This was an "I" so I was able to do 3 sides and then fill. Letters like "M" "N" and "W" you will want to fill as you go. Also, letters that have holes in the middle, you will want to stitch the middles first and then work on the outside.

Ready to fill
8. Once you have stitched and stuffed, stitch across the top all the way back to the starting point. 
9. Tie a knot into first stitch.
10. After I tie the knot I like to push the needle down the side of the letter, and THEN cut off the extra floss. I feel like this helps hide the knot string. 


Once you have them done you can give them to the kids to start learning! Elias was super interested in them at about 15 months and could identify all 26 letters and get them upon request at 19 months! This little letters are still one of his favorite toys and I can't wait to start using them to spell words. 

These would be really cute in alternating colors! Please feel free to share your thoughts and questions with me.

 Follow me on Google+ or Facebook for more fun craft ideas for the kiddos


Sunday, August 25, 2013

Beginner Quilt

Last week I had some ladies over to learn how to start a quilt. I picked a design that I hoped would be quick and easy. I learned that when you get woman together, it is much more fun to talk then anything else! :) Needless to say we didn't get a whole lot done, but we I hope we got enough so they learned something.
A special thanks to Annmarie and Wendy for sewing the strips together and pressing them!

The quilt still needs to be backed and the binding put on, but I think its a good start! After that it's off to be auctioned off for J.L.Mann's Spirit week.

Make sure to follow me to see how this turns out!

Saturday, August 24, 2013

DIY Anthropologie Inspired Beaded Headband

Greenville just got our very own Anthropologie store not long ago, and I quickly became obsessed! I saw some super cute headbands, but could not bring myself to pay $32 and up for them. That is when I decided to make my own. I got my beads at Hobby Lobby when they were 50%  off and spent a about $6. That was enough to make 3 HEADBANDS! Here is what I did...

                                             Anthropologie one the top, DIY on the bottom

Materials:

  • Scrap of Black fabric (3 in by 12 in)
  • Scrap of any other fabric (for the back)
  • 1/8 yard medium weight interfacing
  • Beads (whatever you want! This is the fun part,)
  • An old headband (or buy new ones. The skinny stretchy ones are what I used)
  • Needle and thread (The needle needs to be skinny enough to fit through the beads)
  • Iron
  • Black embroidery floss (optional)
  • Fabric glue (optional)

Instructions:
  1. Attach Interfacing to both pieces of fabric with a hot iron
  2. Lay out beads in different patterns until you find the ones you love
  3. Start at 1 end of the black fabric and start adding the beads. I started with the center beads and just eyeballed it. To make it easier you can use a water soluble pen and draw the circles on. 
  4. Once you are done with your first circle move on to the next until you have about 10 - 11 inches of bead work done
  5. OPTIONAL Use a SMALL amount of fabric glue down the middle of the black fabric to adhere backing fabric.
  6. Pin backing fabric to black fabric
  7. With backing fabric and beaded fabric together, cut about 1/8 inch away from the beads (It using a machine see how close your foot will allow you to get before cutting) 
  8. Fold (or cut) headband in 1/2 and insert one side into each end of the beaded band
  9. This is where the embroidery floss comes in. I hand stitched one side closed and machine stitched the other with a zipper foot to see which I liked the best. I like the hand stitched side much better because you can get closer to the beads and give the circles a more rounded and even look, but its totally up to you. 
  10. Stitch all the way around (make sure to back stitch if you are using a machine!) 
That's it, you're all done. Below are more detailed pictures. I hope they help.
I inserted 4 small beads onto the needle at a time (only 1 of the others at a time). Then I pushed them against the others to see where to insert my needle back into the fabric. Come back up through the fabric BEHIND the last bead. This will help the beads achieve that rounded look. Add more beads until you have completed the circle. At that point I went through the first bead to round everything out.

I  cut 1 side of the fabric, stitched it, then cut the other side. 
ENJOY!!

I'm hope this has given you some ideas on adding a few headbands to your collection or making Christmas gifts (I know what all my girl friends are getting)!! Please share your designs with me if you decide to make one, I would love to see it!


Tuesday, August 20, 2013

Old Chair, New Chair!

It was a long week, but I FINALLY got another wingback chair reupholstered. Only 1 more left! I will do a DIY tutorial on the last one since Kathryn will be reupholstering one at the same time. I really just wanted to get this one done, and we are trading in the Juke for a bigger car and needed the garage space.
OLD Chair

NEW Chair - Malachi admiring Mama's work 

                                            Elias thinks the new chair is his new TV chair :)

Monday, August 19, 2013

10 Minute Teether

I saw a super cute teether on Pinterest and figured I would make one since Malachi always needs to have something in his mouth! They were super easy to make and Little Once Boutique had easy to follow directions. Here is a link to her blog if you want to check it out! http://www.littleonceboutique.com/2013/05/diy-teething-necklace.html


I thought about making this without the ribbon to shortcut the process but you really should use it. If for some reason the stitching comes undone the bead could be a choking hazard, and it's already in their mouth! YIKES! The ribbon should give you a little extra time to notice that the necklace needs some TLC.

And the 1st bead is on! 
All done!